How To Use A Belt Sander.
A belt sander is one of the most powerful material removal tools you can have in your workshop. When you use it correctly, it flattens uneven surfaces, strips old paint, and shapes timber faster than almost any other handheld sander. When you use it incorrectly, it can gouge your workpiece in seconds. The good news is that mastering a belt sander is straightforward once you understand the key principles. This guide walks you through everything you need to know to get clean, controlled results every time.
Affiliate Disclosure: This post contains affiliate links. If you purchase through our links, we may earn a small commission at no extra cost to you.
Table of Contents
Understand Your Belt Sander Before You Start

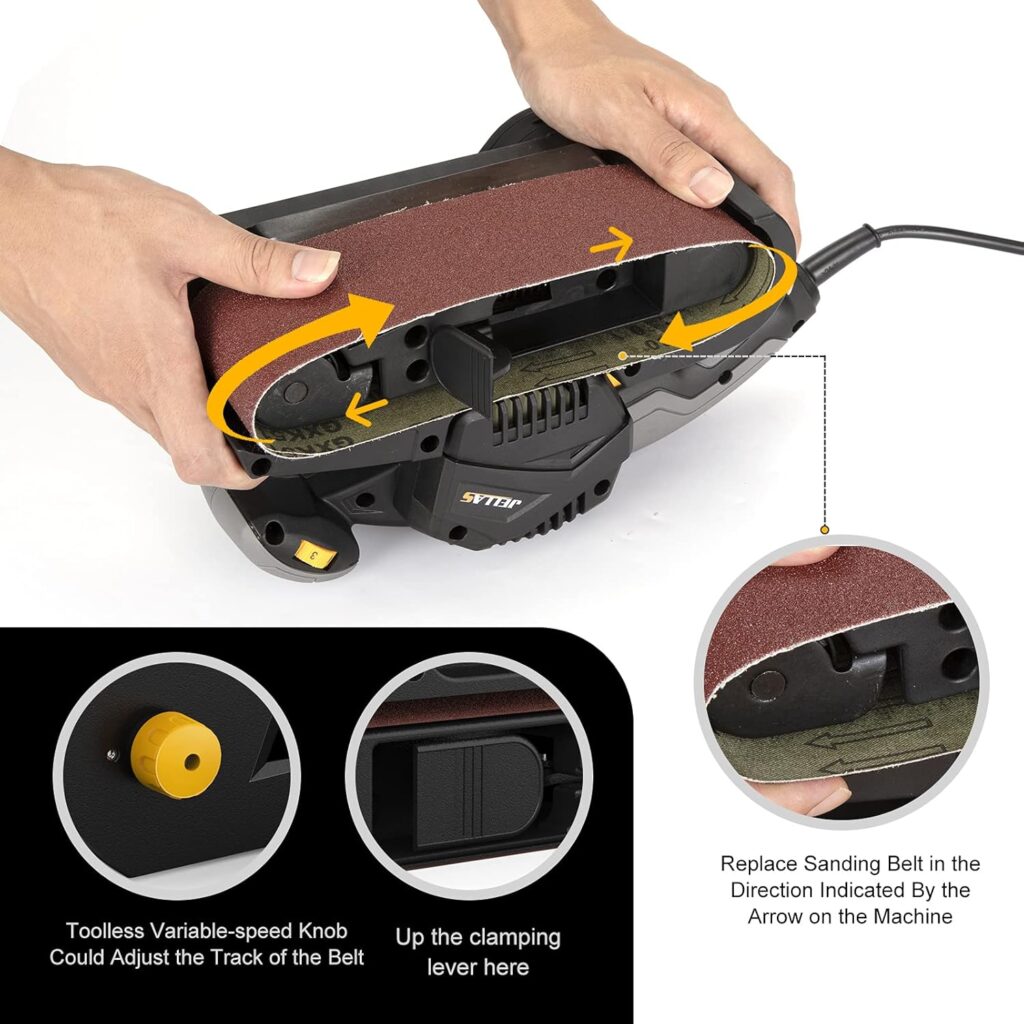
Before you switch the tool on, take a moment to get familiar with its parts. The sanding belt wraps around two drums and runs continuously in one direction. Most belt sanders have a tracking adjustment knob that keeps the belt centered on the drums.
If the belt drifts off to one side during use, a quick turn of this knob corrects it. You should also check that the belt is fitted correctly and that the arrow on the inside of the belt matches the direction of travel shown on the sander body. A belt fitted the wrong way around wears out faster and gives a rougher finish.
Choose the Right Grit for the Job
Grit selection is one of the most important decisions you make before sanding. Coarse grits between 40 and 60 are suited to heavy material removal, flattening warped boards, or stripping thick paint layers.
Medium grits between 80 and 100 work well for smoothing rough timber and preparing surfaces for finishing. Fine grits between 120 and 150 are for light finishing passes before you move on to a finer sander.
As a rule, start with the coarsest grit that gets the job done and work progressively finer. Skipping grits wastes time because each new grit has to remove the scratch marks left by the previous one.
Set Up Your Workpiece Properly
Secure your workpiece before you begin. A belt sander moves aggressively and will push a loose board around your bench, which leads to uneven results and creates a safety risk. Use clamps or a bench vice to lock the material in place.
Make sure there are no nails, screws, or staples in the surface you are sanding. These will tear the belt instantly and can send metal fragments into the air. Keep your dust bag or vacuum connection attached throughout so you are not working through a cloud of fine dust.
The Right Technique for Moving the Sander
Always move the belt sander in the direction of the wood grain. Sanding across the grain leaves deep scratches that are difficult to remove later. Keep the sander moving at all times. If you pause in one spot, even for a second or two, the belt will cut a hollow into your workpiece.
Use long, steady, overlapping passes from one end of the board to the other. Apply light downward pressure and let the weight of the tool do most of the work. Pressing too hard slows the belt, overloads the motor, and increases the chance of leaving marks. Keep both hands on the tool at all times for full control.
Avoid the Most Common Mistakes
One of the most common mistakes is tilting the sander to one side, which rounds over the edges of your board and leaves an uneven surface. Keep the sanding plate flat against the material throughout each pass.
Another common error is starting the sander while the belt is already resting on the workpiece. Always start the motor before you lower the sander onto the surface, and lift it off the surface before switching it off.
This prevents the belt from digging into the wood at the start and end of your pass. Finally, change your belts regularly. A worn belt generates heat through friction rather than cutting efficiently, which can scorch the wood surface.
Stay Safe While You Work

Belt sanders produce a lot of fine dust very quickly, even with dust collection running. Wear a dust mask rated for fine particulates, and safety glasses to protect your eyes. If you are sanding in an enclosed space, make sure there is adequate ventilation.
Keep the power cord behind you and away from the sanding path so it does not accidentally contact the moving belt. When you set the tool down between uses, always wait for the belt to come to a complete stop before placing it on any surface.
Get the Most Out of Every Pass
A belt sander rewards patience and proper technique. When you choose the right grit, keep the tool moving, follow the grain, and stay aware of your posture and pressure, you will produce flat, smooth surfaces much faster than with any other method.
Take your time on the first few projects to build good habits, and the technique will quickly become second nature. Once you are comfortable with the basics, you will wonder how you managed without this tool in your workflow.
Also Read On: